What functions does a bicycle chain perform? Anyone who has even briefly encountered bicycles, not to mention amateurs and professionals, can answer this question. A chain is a transmission element that acts as an intermediary in transmitting the cyclist’s efforts to the rear wheel.
The most important indicator of the effectiveness of its work is rigidity. An over-tensioned chain makes movement difficult, quickly wears out the gear shift system, and even breaks down. In a weakened state, it dangles, does not allow you to change gears clearly and can generally fly off the stars.
Optimal tension is the key to successful and long-term operation of the entire transmission unit. Many bike owners independently change the degree of rigidity by removing or adding links. However, there is also a special device - a chain tensioner, which autonomously controls the stiffness and helps the cyclist get rid of unnecessary fuss.
When is stretching necessary?
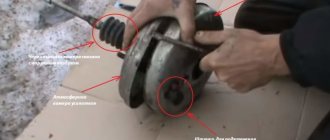
The gas distribution mechanism on the VAZ 2107 injector consists of the following elements:
- intermediate and crankshaft gears;
- camshaft and intermediate shaft;
- rocker;
- sedative;
- intake and exhaust valve;
- tensioner;
- shoe;
- timing chain drive.
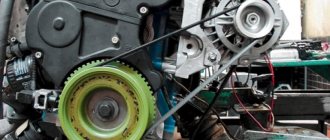
The photo shows timing parts.
Thanks to the timing belt, the air-fuel mixture is supplied and exhaust gases are removed. Its operation is carried out using a chain drive or belt. They transmit torque from the crankshaft to the camshaft.
The shafts must be in a certain position. To do this, special marks are placed on the crankshaft pulley and the camshaft sprocket, which must be set correctly. If the marks do not match, serious problems with the engine may occur, including major engine repairs.
During operation, the chain drive and belt are under constant tension, so after a while the chain gradually stretches - its pitch increases. In this case, the engine begins to idle unstably, the speed begins to fluctuate, and the engine may stall.
If metallic sounds appear when increasing or decreasing speed, this is a sure sign of stretching of the chain drive or wear of the damper. To eliminate these sounds, you need to tighten the chain or replace the damper. Chain drive tensioning should also be done after replacing any timing parts, including the guide rail and shoe.
The chain drive on the VAZ 2107 injector is adjusted using a tensioner, which can be a mechanical, automatic or hydraulic tensioner. To install a hydraulic tensioner on a VAZ 2107, you need to redo the timing belt. Instead of the standard one, an automatic tensioner is often installed; it is more reliable.
Step-by-step instruction
Before starting work on tensioning the chain, the car must be placed in a comfortable position. Place the gearshift knob in the neutral position and secure the wheels so that the car does not roll during the procedure.
Tools
To carry out the work, the following tools are required:
- set of socket wrenches;
- set of heads;
- pliers;
- screwdriver;
- hammer.
Before starting work, you should make a visual inspection of the chain drive. If mechanical damage is found to the tension roller, shoe, guide, sprockets or chain, the defective parts must be replaced.
Stages
The sequence of work when tensioning the chain both in an engine with an injector and with a carburetor consists of the following steps:
- To access the timing chain, it is necessary to remove the protective cover by unscrewing the mounting bolts that hold it in place.
If they are not set correctly, the valve timing will be disrupted. As soon as you need to exert a lot of force, you need to stop and hold the shaft from turning with a key. It is in this position that the tension will be sufficient.
Sometimes tensioning is impossible because the chain stretches over time and the plunger is no longer long enough to make the adjustment. If you do not plan to change the product, then for temporary driving you can increase the tensioner rod, for example, by attaching a bushing to the end of the rod, with which the air filter is attached. But still, a worn-out product must be replaced in the near future.
If noise occurs in the engine where the automatic tensioner is installed, then no adjustment is made, but the timing parts are replaced. The condition of the gas distribution mechanism must be constantly monitored, replacing the belt and tensioning the chain in a timely manner. It is important to check the chain tension before adjusting the valves.
Is it possible to do it yourself?
You don’t have to buy the calm, you can actually make it yourself. To make rockring and fastening yourself, there are many visual diagrams on the Internet. As for pen mounts, self-made models are even better than store-bought ones. Craftsmen, armed with a drill and a jigsaw, assemble very decent options that cope with the main function of the device and prevent the chain from flying off. An easy-to-make but effective damper is made from a reflector.
Most often they make:
- Rockring (partial or full) with BB mount.
- ISCG mount with frames. They make it with their own hands, without using metalworking.
- Rollers for the front (rear) sprocket with partial fastening.
- Frames protecting the chain.
Video “Chain Knocking on a Classic”
This video examines the cause of engine knocking and demonstrates chain drive tension.
A VAZ 2107 timing chain tensioner is installed on the front right side of the car engine. The main purpose of such a mechanism is to tension the chain, which in turn is extended during operation.
Replacement work is not difficult and is completed within a short period of time. To replace the tensioner you must:
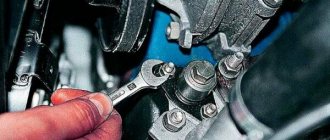
- Open the hood of the car and in the engine compartment, use a ten-point socket wrench to unscrew the two bolts securing the tensioner to the cylinder block and carefully remove it. A sealing gasket will be installed between the tensioner and the block. Check its condition and, if necessary, replace it with a new one.
- Having removed the tensioner body, we clamp it in a vice and use a thirteen key to unscrew the central cap nut, thereby checking the serviceability of the collet lock. If a crack is detected, it is necessary to replace the cap or the tensioner itself.
After checking the tensioner and if it needed to be replaced, you can begin installation. Before installing it, the tensioner must be charged; to do this, push the plunger all the way in and, holding it in this state, tighten the cap nut.
I tighten the cap nut, install the tensioner in its place and tighten the bolts that secure it. Then we turn the crankshaft one turn, thereby tightening the camshaft drive chain, after which we release the cap nut, releasing the tensioner, and tighten it again. At this point, the repair work to replace the timing chain tensioner of the VAZ 2107 is completed.
Sometimes a car enthusiast encounters extraneous sounds that come from the area of the front engine cover and resemble a kind of tapping. This may be a sign that the chain guide needs to be replaced. The damper on the VAZ 2107 model is necessary to soften the vibrations of the chain during its rotation. If you can clearly hear a clattering or metallic tapping sound, this means that the damper is very worn and needs to be urgently replaced. Another possible cause of the problem is that the chain tension is too loose. In this car model, the damper is located on the left, in front of the cylinder block. Use the diagram supplied with the machine to determine the exact location of the part to be replaced.
Replacing a chain guide on a VAZ 2107 is not a complicated procedure. Each driver will be able to carry out such an operation independently if he takes into account several important points. When replacing a part yourself, you need to proceed like this.
The long fastening bolt is installed at the top, and the short one at the bottom. If the bolts have a significant degree of wear, they need to be replaced, otherwise even after replacing the damper, the characteristic tapping sound may remain.
If the damper simply breaks into pieces while moving, you need to remove all its components. Sometimes this is quite difficult to do and you have to invent various devices to get the debris out. In such a situation, a magnet attached to the end of a long wire can help out. Place all the removed parts together to determine if there is anything left inside.
Do not buy the parts needed for replacement at a service station - there they will cost 1.5-2 times more than at the car market or in a specialized store.
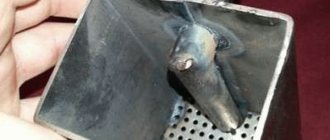
Reflector dampener
One of the simplest to make, but quite effective sedatives. It copes well with the main task - preventing the chain from falling off. At the same time, the chain holds perfectly during a quiet ride and during bumps and bumps.
To make a chain guide with your own hands you will need:
- an ordinary bicycle reflector (it is better if the diameter of the mounting ring matches the diameter of the seat tube);
- nuts;
- bolt;
- screwdriver;
- hacksaw for metal.
When you have found all the necessary tools and materials, you begin production. Take the reflector and unscrew the reflector. All you need is a foot. Mount it to the seat tube above the chain. It should not rub against the chain, but should be as close as possible, just a few millimeters. After this, saw off the excess length so that it does not interfere with pedaling. This type of stabilizer will perfectly hold the bike chain when jumping over curbs and during side landings.
Chain stabilizer made of reflective material prevents the chain from falling off
You can screw an asterisk to the foot. You need to install such a tensioner on the pen with the asterisk down. This way you can tighten up the sagging lower part of the bike chain.
What is the cost of a new VAZ 2107 tensioner?
In order to change an automatic tensioner, on average you need 600-700 rubles. TZA (Togliatti Automotive Units Plant) produces the best, “native” tensioners for “classics”. The package (blue) has the packer's number as well as an authentication sticker with a protective layer. Under the layer there is a code, when entered, you will receive an SMS confirmation. Inside there must be an insert - a form with the name of the product, the date of manufacture, and the blue original seals of the quality control department.
What is the sequence of actions when replacing?
First, remove the cylinder head cover. This will be required in order to correctly determine the chain tension at the very end.
- Remove the air filter housing from the carburetor. Then we disconnect the throttle linkage from the roller.
- Then you need to remove the lever with rods.
- And finally, we disconnect the fuel hose from the bracket that goes from the fuel pump to the carburetor.
- Using a 10 mm tubular wrench, remove the cylinder head cover. This must be done so that you can check the chain tension by hand.
- The VAZ 2107 timing chain tensioner is located on the right front side of the engine. First, using a 10mm wrench, unscrew the tensioner mounting nuts.
- We take it out of the engine. There should be a gasket between the engine housing and the tensioner. Try not to damage or lose it, since a new gasket is almost always sold only complete with the tensioner. Sometimes it can start to “etch”, and in order not to purchase a kit to replace it, save the old gasket.
- We fix the new automatic tensioner vertically in a bench vice. Then use a 13 mm wrench to loosen the cap nut. After this, the plunger became movable and moves freely in the tensioner body.
- Now we “charge” the tensioner plunger. To do this, we place it vertically (the place where we place it is shown by a blue triangle). Then press vertically downwards with force (pressure points are shown in red). The plunger is “recessed” into the body.
- Now you need to continue pressing on the body and holding the plunger “cocked” and tighten the nut back with a 13 mm open-end wrench.
- Now we install the “cocked tensioner” together with the gasket into the engine housing. Using an open-end wrench 36-38 (the VAZ 2107 may have either a nut or a ratchet, so the sizes are different), turn the crankshaft clockwise by an average of one and a half to two turns. When the greatest resistance to movement arises, then the chain will be stretched to its maximum. The main thing is to ensure that the crankshaft does not turn back due to compression and that the chain tension does not weaken. If you don’t have a key for 38, you can turn on the ignition and turn the crankshaft with the starter.
- We tighten the nut back, holding the crankshaft from “shock absorption” back. Then we check the tension result by pressing the chain with our hand again. There should be no deflection. Now we install the block head cover in place.
- Only after the chain is tensioned should you loosen the tensioner cap nut. The plunger will release and "shoot", causing the shoe to seal tightly against the chain. At this time, a click will be heard. Only after a click does the tensioner cap nut need to be tightened tightly.
We adjust the position of the switch above the stars.
Now we connect the gear shift cable in place. We tighten the cable length adjustment nut (located between the jacket and the shifter) on the switch until it stops, and we also screw the adjustment nut on the shifter (on the steering wheel, located between the jacket and the shifter) until it stops. We simply tension the cable and secure it with a hexagon bolt.
Then we click the shifter two (let’s say) times - as a result, the roller should be (in mind) above the third star. But, most likely, you will have something like the photo below
As soon as you accurately position the video above one of the stars, it will automatically move accurately between other stars.
The exception happens if the switch itself is very worn out (behaved, skewed, the cock between the switch and the frame may be bent) - then you will have to look for something in between. So that it hits more or less below, and above.
After that, we put the chain back on - spin the pedals (is the bike still upside down?), click the switch back and forth, spin the pedals, click again, and enjoy the sight of the chain running across the cassette. You can do this for another 10-15 minutes without getting bored